

Table of contents
📍 Introduction:
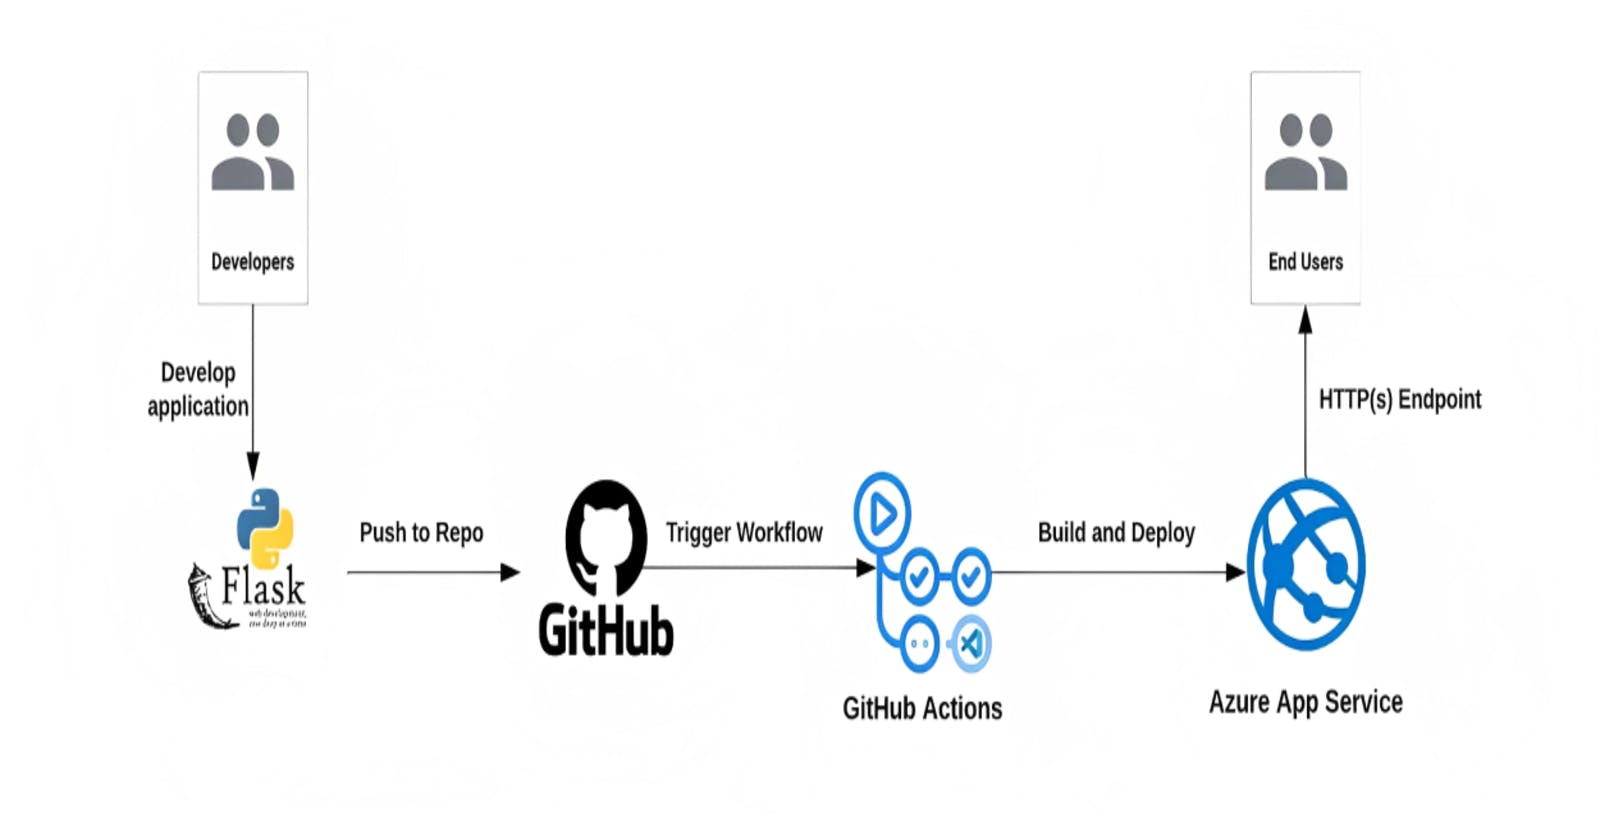
In this blog post, we will walk through the process of setting up a Continuous Integration and Continuous Deployment (CI/CD) pipeline for a Python Flask application using GitHub Actions and Pytest. By the end of this tutorial, you will have a fully functional CI/CD pipeline that automatically builds, tests, and deploys your Flask application whenever you push changes to your GitHub repository.
📍 Prerequisites:
A GitHub account
A Python Flask application
Familiarity with Git and GitHub
Azure Account with Subscription
🔹 Step 1: Setting up the Flask Application
First, let's create a simple Flask application. If you already have one, you can skip this step. Create a new directory for your project and navigate to it in your terminal. Then, create a virtual environment and install Flask:
mkdir flask-ci-cd
$ cd flask-ci-cd
$ python3 -m venv venv
$ source venv/bin/activate
(venv) $ pip install Flask
Now, create a file named app.py and add the following code:
from flask import Flask

app = Flask(__name__)

@app.route('/')
def hello():
    return 'Hello, World!'

if __name__ == '__main__':
    app.run()
🔹 Step 2: Adding Tests with Pytest
Next, we'll add some tests for our Flask application using Pytest. First, install Pytest:
pip install pytest
Create a directory named tests and a file named test_app.py inside it. Add the following code to test_app.py:
import pytest
from app import app

@pytest.fixture
def client():
    app.config['TESTING'] = True
    with app.test_client() as client:
        yield client

def test_hello(client):
    response = client.get('/')
    assert response.status_code == 200
    assert response.data == b'Hello, World!'
🔹 Step 3: Creating the GitHub Actions Workflow
In your project's root directory, create a new directory named .github and a subdirectory named workflows. Inside workflows, create a file named ci-cd.yml. This is where we'll define our CI/CD pipeline.
Add the following code to ci-cd.yml:
name: CI/CD Pipeline

on:
  push:
    branches:
      - main

jobs:
  build-and-test:
    runs-on: ubuntu-latest
    steps:
    - name: Checkout repository
      uses: actions/checkout@v2

    - name: Set up Python
      uses: actions/setup-python@v2
      with:
        python-version: 3.8

    - name: Install dependencies
      run: |
        python -m pip install --upgrade pip
        pip install -r requirements.txt

    - name: Run tests
      run: pytest

  deploy:
    needs: build-and-test
    runs-on: ubuntu-latest
    steps:
    - name: Checkout repository
      uses: actions/checkout@v2

    - name: Set up Python
      uses: actions/setup-python@v2
      with:
        python-version: 3.8

    - name: Install dependencies
      run: |
        python -m pip install --upgrade pip
        pip install -r requirements.txt

     - name: Deploy to Azure App Service
      uses: azure/webapps-deploy@v2
      with:
        app-name: <your-app-name>
        slot-name: production
        publish-profile: ${{ secrets.AZURE_WEBAPP_PUBLISH_PROFILE }}
        package: .
This workflow is triggered whenever you push changes to the main branch. It consists of two jobs: build-and-test and deploy. The build-and-test job checks out your repository, sets up Python, installs dependencies, and runs tests using Pytest.
To deploy to Azure App Service, you'll need to set up a publish profile for your app. Here's how to do it:
In the Azure portal, navigate to your App Service.
Click on "Deployment Center" in the left-hand menu.
Select "GitHub" as the source control.
Follow the prompts to connect your GitHub account and select your repository.
Once your repository is connected, click on "Deployment Credentials" in the left-hand menu.
Click on "New Credentials" and create a new set of credentials.
Copy the "Publishing Profile" XML file that is generated.
In your GitHub repository, go to "Settings" > "Secrets" and create a new secret named AZURE_WEBAPP_PUBLISH_PROFILE.
Paste the contents of the XML file into the value field of the secret.
Make sure to replace <your-app-name> with the name of your Azure App Service app in the deploy job of the workflow file.
🔹 Step 4: Pushing Changes to GitHub
Commit your changes and push them to your GitHub repository:
$ git init
$ git add .
$ git commit -m "Initial commit"
$ git branch -M main
$ git remote add origin <your-repository-url>
$ git push -u origin main
Now, whenever you push changes to your main branch, the GitHub Actions workflow will automatically build, test, and deploy your Flask application.
📍 Conclusion:
In this blog post, we've demonstrated how to set up a CI/CD pipeline for a Python Flask application using GitHub Actions and Pytest. This pipeline will help you ensure that your application is always tested and deployed with the latest changes, improving the overall quality and reliability of your software.
🔹 Image Credit: GitHub Actions 101 with Azure App Service | by Akash Mahale | Dev Genius
🔹 Checkout GitHub Repository for projects: